Interactive tool helps you build the best schedule
The Schedule Planner offered by UMBC is a dynamic tool that can generate multiple possible schedules, and then send them to checkout in PeopleSoft. You can access it by navigating to myUMBC, selecting topics, and then selecting classes & grades.
It’s important to note that the scheduler does not replace Peoplesoft when adding classes, but it does make scheduling classes easier.
Before beginning, you may need to disable the pop-up blocker on your browser to launch the Scheduler Planner. The Scheduler Planner helps you plan your classes you want to take while factoring in your free time needs. It’s a mobile friendly, cloud based tool that will remember all your values you select while using it. The planner can be broken down into three key sections: search terms, courses & breaks, and schedules.
Search Terms
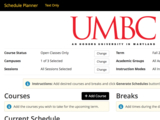
Once you’re set, using the planner is easy and intuitive. You can select which campus you want to plan your schedule on (Shady Grove, Off Campus, UMBC), or even incorporate all three.
Image shows what the search fields look like when using the desktop client. From here, you have complete customization of how you want to search for classes and generate your schedule.
The Schedule Planner takes into account many different terms you can set yourself. You can search for open classes only, open & full, or even open & full with an open waitlist. You can also choose between online classes and hybrid classes. Want to set the search to only Engineering & Information Technology? You can change that under the Academic Groups field.
Courses & Breaks
You can search for any class through the Schedule Planner by subject or by course attribute. To get started, select “Add Course” and then proceed to search for what course you want. After adding the course, you can select “Options” to choose what sections you want to include or exclude before you generate your schedules.
Image shows an example course selection list when using the desktop client. Under “Options” you can select which section you want to include before generating your schedule. The “i” in the blue circle gives the course info. Note that until you view a possible schedule, the lock icon will be greyed out. After you do view a schedule and lock it from there, you can unlock it
Breaks are times during the day that you do not wish to take classes. You can add multiple breaks that can be customized individually and applied to whichever day you want.
Schedules
After you have added your desired courses and breaks, simply select “Generate Schedules”. If you have any course conflicts, you won't be able to see the schedule until you address the conflicts. If you select the magnifying glass you can get a quick glance at what each schedule looks like.
Image shows what the view screen looks like using the desktop client. You can lock courses, see how many seats are open and get a basic overview of how long each course runs. Note the message up top that reads "You are viewing a potential schedule only and you must still register." These classes are not in your cart so be sure to use the "Send to Shopping Cart" option to proceed to PeopleSoft's interface
For more in-depth information, you can select 2 or more schedules to compare side by side. You can also select view to give you a complete look and overview of everything. One thing you can do is “lock” a course by selecting the lock icon. This tells the planner tool that you want to keep that particular section for a course which it will then only incorporate if you decide to generate alternative schedules.
Once you finalize which schedule you want, you can send all of the courses you have selected straight to PeopleSoft checkout. There are helpful videos at the top of the Schedule Planner tool in addition to DoIT’s FAQs on the tool.
Image shows an example of a 'finalized' schedule.
Interested in learning about how the Schedule Planner came to be? Check out that story here.
Want to know what other software is available to UMBC students? Check out the Student Resources Page over on the DoIT website.
Be sure to follow the DoIT myUMBC group for more news and updates.
Posted: January 23, 2017, 3:16 PM